Blogger trick 4 you about the blogger, seo services, adsense, softwares, tips and trick, games, widgets, hosting, make money, how to create a website.

Showing posts with label blogger. Show all posts

Monday, 6 January 2014

Google's New Mobile Sitemap Format

By on 18:38
View Google's New Mobile Sitemap Format


The Search Gaint Google has changed it mobile sitemap format with new tag and additional name space requirement, below is the new format.

<?xml version="1.0" encoding="UTF-8" ?>
<urlset xmlns="http://www.sitemaps.org/schemas/sitemap/0.9"
xmlns:mobile="http://www.google.com/schemas/sitemap-mobile/1.0">
<url>
<loc>http://mobile.example.com/article100.html</loc>
<mobile:mobile/>
</url>
</urlset>


If the <mobile:mobile/> tag is missing, your mobile URLs won't be properly crawled. Each Mobile Sitemap must have a unique name.
This tip is work for onle mobile phone 

Hot Tip Use the US version google search

By on 18:35
 Hot Tip Use the US version-google search


Hot Tip Use the US version-google search Being US based, Google tends to roll out all its new features to the US English version first, leaving the UK English version to languish. If you can stand a few misspelled words in exchange for shiny features:

Click the Settings link in the top right-hand corner
Change the Mail display language to English (US), scroll down and click Save changes

Googles recommendations for linking between mobile and non mobile pages of a website

By on 18:33
Googles recommendations for linking between mobile and non mobile pages of a site


Blogger tips and tricks not a fun. But we can try to create it fun . Friends ! Today i share an article how to Google recommendations for linking between mobile and non mobile pages of a site for non responsive design..

Annotations for desktop and mobile URLs

To help our algorithms understand this configuration on your site, we recommend using the following annotations:

On the desktop page, add a special link rel="alternate" tag pointing to the corresponding mobile URL. This helps Googlebot discover the location of your site's mobile pages.
On the mobile page, add a link rel="canonical" tag pointing to the corresponding desktop URL.

We support two methods to have this annotation: in the HTML of the pages themselves and in Sitemaps. For example, suppose that the desktop URL is http://example.com/page-1 and the corresponding mobile URL is http://m.example.com/page-1 . The annotations in this example would be as follows:
Annotation in the HTML

On the desktop page, add:

and on the mobile page, the required annotation should be:

This rel="canonical" tag on the mobile URL pointing to the desktop page is required.

Top 3 Tips to Make Money With Google AdSense

By on 18:29
Top 3 Tips to Make Money With Google AdSense

Everyone want money making with Google AdSense, Google AdSense is a largest company and famous choice for anyone. How to making money with Google Adsense? First starting out in internet marketing but unless you know how to check your keywords effectively you will be doomed for failure even before you start building your site. Here are 3 tips that you must check with every new AdSense site that you build.


You need plenty of traffic
For every keyword and especially your main domain keyword that you check you have to make sure it gets enough demand or traffic. It is no good building a site around a keyword and ranking number 1 in Google if there is no traffic for the keyword. A good amount of traffic to go for, for your main keyword is around 1000 exact match or below and below 800 for your other internal pages.


Always check to see how many advertisers your keyword has
Before you choose a keyword you must check the CPC or cost per click to see whether or not the keyword has advertisers. You should always use spyfu.com to get an accurate figure how for how many advertisers are currently bidding on your keyword. Even if a keyword has thousands of monthly searches in Google, if spyfu.com says that there are no advertisers then stay clear of the keyword because you wont make any money. Also a good number of advertisers to go for is a minimum of 5.


You must check page 1 of Google for competition
Another check you must always do is make sure you give page 1 of Google a good check over to make sure you can rank otherwise it does not matter how much traffic your keyword or keywords get each month if page 1 of Google is very competitive then you will be waiting a lifetime to rank and make any money from your AdSense site. You must check Google for your main keyword every single time and still check Google for your internal pages also to make sure that you can rank.


These 3 tips will definitely help you to make more money with Google AdSense and if you even forget to check one of these then you will be fighting an uphill battle from the very start. There are lots more checks that you must know and you need to carry out with every new site that you build. If you want to learn exactly how to build profitable AdSense sites then you need to watch these free videos right away.

Saturday, 28 December 2013

Top 3 Foremost Forex Trading Tips

By on 17:35
Top 3 Foremost Forex Trading Tips

Forex trading is recommended for persons who are involved in the undertakings of trading forex as are against to people who are more involved in making cash. Strong feelings play a significant function in impacting the outcomes. A individual who is desperate to make cash to resolve his/her accounts and payoff his/her mortgage is more likely to trade without any verified signals. You may consider becoming a full time dealer once you have came by the essential skills. When you are just starting out, it is advisable to have another job that caters for your costs. The Foremost Forex Trading Tips in trading forex encompass:


Trade the signals as opposed to the trades
If you have had some successful trades and in the process grown your capital, it is very tempting to seek for more risks. In the process, you may end up taking the wrong signals. This is likely to result in you losing what you had gained from good trades. When handling a single trade it is important to forget previous trades, be they gains or losses. This will help you focus on the most important signals to make an informed decision. Furthermore, avoid making risks more than is necessary simply because you have more money and have been successful over the short past. 

Read: Top 7 Affiliate Programs Easy Ways To Make Money 
 
Being over-confident
Being over confident can have more serious repercussions than not having confidence. When you have no confidence, you end up doing nothing. However, when you are so sure of your actions without having any good signals can cost you a substantial amount of money. Making several good trades is not an indication that you are an advanced or professional trader. Likewise, making several bad trades does not mean you are a bad forex trader. It is important to manage you confidence levels in order to avoid the cycles of failure. Therefore, you need to analyze the market carefully to make the right decisions.

Read: Forex No Deposit Bonus Simple Forex Trading Career 
Avoid competing with other traders
Different traders employ different trading strategies and styles. This explains why the results are often different. Some of the traders may be willing to take a 2% risk for a 5% to 10% profit every month, while other traders may be willing to take more than 20% risk and seek to double their profits every month. It often takes time for a new trader to discover his own style of trading. Once he/she discovers the most effective style he/she should avoid finding out from other traders, how much they make.

Thursday, 26 December 2013

10 Tips to Configure Hotmail Email Account on Outlook

By on 07:19

 10 Tips to Configure Hotmail Email Account on Outlook
To day i share with friends how to configure Hotmail Email account on outlook? Here are most and best simple 10 tips. Microsoft has been endorsing imminent updates to their Hotmail service, capable to make it an even better web mail service but Microsoft's revamped Outlook 2010 is already here. Here you can learn how to put together Hotmail with Outlook. Outlook 2010 works with an extensive diversity of email accounts, IMAP, including POP3 and Exchange accounts.

The single problem with POP3 and IMAP accounts is that they only sync email, but not your calendar and contacts like Exchange do. Hotmail, though, lets you sync your email, contacts, and calendar with Outlook with the Hotmail Connector. This lets you keep all of your PIM data easy to get to from everywhere. Let's look at how we can set this up on our account. The best thing is that users can do all of this on their own and without contacting their Microsoft tech support services. The guide will help you configure Microsoft Outlook 2010.
READ ALSO:Create Facebook and Twitter Custom Follower Counters
1. The first step is, you have to open Microsoft Outlook

2. Now just click on the File tab

3. You will find an Add Account Button under the 'Account Information' Section, Click on this "Add Account" button.

4. Now you will see a new window will pop up in which you'll have to submit your name, your Hotmail address and your password in the relevant fields. Now click on next.

5. Here at this point, you may be provoked to install Outlook Hotmail Connector. If it does show up, click 'Install Now'

6. To start the installation, click 'Run'

7. Now select the Software License Terms check box and click 'Continue'

8. When the software gets installed, you need to click "cancel" in the 'Add New Account'.

9. Now close and restart the Outlook

10. Once your account has been added, you can add more accounts by clicking 'Add another account' or you can click on 'Finish' to end the setup process.
READ ALSO:Random 125 X 125 Ad Banners Widget For Blogger
Above mentioned tips are very easy and simple to follow. If you find that it's too difficult, or if you are not comfortable editing the Computer Settings then avoid doing it yourself. You must call up Hotmail technical support. Their technical support experts have great experience in providing Hotmail support and can help you out with an excess of problems related to your account like:
READ ALSO:Twitter Recent Posts Widget, The Rare Widget Ever!
• Help you to configure your account with Outlook
• Support for restoring forgotten passwords.
• Provide help you to integrate your emails with your smart phone.

Tuesday, 24 December 2013

Social Bookmarking Widget For Blogger – Bookmark and Share homepages

By on 17:34
Bookmarking-Widget For BloggerWith the release of Add Cute Flying Twitter Bird I also released some useful blogger widgets which includes a Bookmarking Widget For your blog’s homepage. This widget helps readers to bookmark your blog’s homepage on their favourite bookmarking services like Google bookmark, Stumbleupon, Delicious, Digg etc. It contains icons from  our Social Share Widget With Counters. This is how this widget looks like,

Bookmarking Widget
To add this widget to your blogs, follow these steps,
  1. Go To Blogger > Layout
  2. Click Add a Gadget or Add a Page element
  3. Choose HTML/JavaScript
  4. Inside HTML/JavaScript paste the code below,
<center><tr>
<td valign="top" width="50%">
<table border="0" cellpadding="0" cellspacing="0" width="222">
<tbody>
<tr>
<td width="28" height="30"><img border="0" width="25" src="https://blogger.googleusercontent.com/img/b/R29vZ2xl/AVvXsEg52P_pP9vqUsVvtu65ejKBPdaOcboLth_SzX9TIonGf7Z93zgBevauKJk8FrLjWDYFuA2H47SBqthSGnNM4XZsyxyqUAdNCmnNDYcjeQCbEZJDiOiknXeaoDfqZqrFZ6mTfKJRS-eLJu0/s400/FACEBOOK.png" height="25"/></td>
<td height="30"><a href="http://www.facebook.com/sharer.php?u=http://YOUR-BLOG-NAME.blogspot.com" target="_blank" rel="nofollow">Share on Facebook</a></td>
</tr>
<tr>
<td height="30"><img border="0" width="25" src="https://blogger.googleusercontent.com/img/b/R29vZ2xl/AVvXsEi6moZ70FsEeNyWhqTzAbo9aR7ydwsewrHEvCY9gMsTOvT8PTsrYAMpIpJsSJMxNzADtpz8t36DvKfEec0Za6xMtw92nUEZstkhJfhH0rvciDE12itCzMb30yA88bAJEV0wPA4RyiaeY48/s400/TWITTER.png" height="25"/></td>
<td height="24">
<a href="http://twitthis.com/twit?url=http://YOUR-BLOG-NAME.blogspot.com">Share on Twitter</a></td>
</tr>
<tr>
<td height="30"><img border="0" width="25" src="https://blogger.googleusercontent.com/img/b/R29vZ2xl/AVvXsEiME9d6Xb-dAJSb1nwLyOK8xxCi63wGcbo1TAlSfBHm447sScIpOGDZPqkw3vZZ4KFSDDy57LSJlWAvkstne4prJuT1bxG-E87crmTtF2aWaLTogZvQfz87leDPQzsX_LWxEZF9Z6-7pOc/s400/STUMBLE-UPON.png" height="25"/></td>
<td height="30"><a href="http://www.stumbleupon.com/submit?url=http://YOUR-BLOG-NAME.blogspot.com" target="_blank" rel="nofollow">Share on StumbleUpon</a></td>
</tr>
<tr>
<td height="30"><img border="0" width="25" src="https://blogger.googleusercontent.com/img/b/R29vZ2xl/AVvXsEjAfWnMN3A9F2W5QfqIVHSw3CwL3XRNKYQ6PrOh7CnJfDG5pqpaii_CLS9FJ8vI0hNaAOS_T2UO3h7QMumHOAlFobMt6LPw44Gm6BGgmz9KajosXioS2U2Lkype7knI2zKSInzTOBtuVIY/s400/DELICIOUS.png" height="25"/></td>
<td height="30"><a href="http://del.icio.us/post?url=http://YOUR-BLOG-NAME.blogspot.com" target="_blank" rel="nofollow">Share on Delicious </a></td>
</tr>
</tbody>
</table>
</td>
<td valign="top" width="50%">
<table border="0" cellpadding="0" cellspacing="0" width="222">
<tbody>
<tr>
<td width="28" height="30"><img border="0" width="25" src="https://blogger.googleusercontent.com/img/b/R29vZ2xl/AVvXsEj4tkOTvRY1CyMWVrdG4BIRlq2Klb_UarGzDVB4rF80Etnqn6se9SNrFx0YEjy1a5MJGkvQDNyUTNFUB_vV7FvA_UfkdeGCiDhBswU6enQ7_yLXXXusKsSTCCoTqpaoMrIoASIrHRxL4to/s400/DIGG.png" height="25"/></td>
<td height="30"><a href="http://digg.com/submit?phase=2&url=http://YOUR-BLOG-NAME.blogspot.com" target="_blank" rel="nofollow">Share on Digg </a></td>
</tr>
<tr>
<td height="30"><img border="0" width="22" src="https://blogger.googleusercontent.com/img/b/R29vZ2xl/AVvXsEjcUzuI7MgCHcJVBmBgGKbQJa-r9pTlHMocugOJRoIhbbTU_dfWMX9MAd_DoOI_IfSngKzjr-qc9F6EmUdvn4sGY65U7vn16q6LbVfOk_-RctnK2ESeSEAyt2oQI36_NinSCv26QjACKSg/s400/Google-icon.jpg" height="22"/></td>
<td height="30"><a href="http://www.google.com/bookmarks/mark?op=edit&amp;output=popup&amp;bkmk=http://YOUR-BLOG-NAME.blogspot.com" target="_blank" rel="nofollow" title="Bookmark this blog on Google">Bookmark on Google</a></td>
</tr>
<tr>
<td height="30"><img border="0" alt="Email" width="21" src="https://blogger.googleusercontent.com/img/b/R29vZ2xl/AVvXsEgIpuinWlVimbW9SPmblJFXOR6DObOR0U-WpsSpB_gFq0WU9IrBGrhYcyrE1TXmcMUdXNDUjJQIlC7AKGbOhMDn-xokCqOb_dzCU9pj3H3QeJwaJschjYdJhDVSMtMzkHGLNKVuZSSAUx4U/s400/Email+Orange_128.png" height="22"/></td>
<td height="30"><a href="http://feedburner.google.com/fb/a/mailverifyuri=tntbystc&amp;loc=en_US" target="_blank" rel="nofollow">Receive Email Updates</a>
</td>
</tr>
</tbody>
</table></td></tr></center>
Remember to replace YOUR-BLOG-NAME  with your Blog’s good name and the Subscription Link i.e http://feedburner.google.com/fb/a/mailverifyuri=tntbystc&amp;loc=en_US with your own Feedburner subscription link. You can find your subscription link by going to the following location in your feedburner account, Publicize > Email Subscription . Just below Email Subscription page you will find a code as shown below,
subscription-link


Finally save your widget and preview your blog to see the new change on your blog!

Add CSS Based Social Bookmarking Widget To Blogger Blogs & Websites

By on 17:25
Social-Bookmarking-Widget-For BloggerNever thought this would turn the best designing period of my life. After a lot of trial and error I managed to create a social bookmarking Icons widget using advanced CSS technique. I had consulted a lot of my friends on how to give an hover effect to social bookmarking icons below blogger posts using simple CSS but all methods that were suggested unfortunately did not help.
This widget uses a total of 20 Icons but believe it or not it is super-fast and loads with in seconds. I merged all 20 Icons into one big image and used CSS Image stripes techniqueto make the icons appear at right positions. Fortunately this saves a lot of load time, because the browser will load all images at once and doesn’t need to contact the image server several times for uploading the images.
This is the big image I used,mbt-bookmarking-widget
Now lets add them below each post in blogger ,
  1. Go To Blogger > Layout > Edit HTML
  2. Search For ]]></b:skin>
  3. And paste the code below just above ]]></b:skin>
/*--------BT4U Bookmarking Widget (CSS#1)------*/
.mbt-bookmarking a {
display:block;
height:42px;
width:48px;
padding:0 9px;
float:left;
background:transparent url(https://blogger.googleusercontent.com/img/b/R29vZ2xl/AVvXsEiCMcwFmb_V0uGDf-cnyNep8yIcesHSEtn3ifLR2GGxm2FM4qEkaqLxRUIZECAkTITeqGGh8-ox80bJU5mqkBqWB1IOsMrcZEHJ5RzcVMuNYQ7OUm-V_ZNVfddLiAZoQ4sKcxgYtKuBF7tz/s1600/flapper.jpg) no-repeat;
}
.mbt-bookmarking a.delicious {
background-position:0px 0px;
}
.mbt-bookmarking a.delicious:hover {
background-position:0px -43px;
}
.mbt-bookmarking a.digg {
background-position:0px -86px;
}
.mbt-bookmarking a.digg:hover {
background-position:0px -129px;
}
.mbt-bookmarking a.stumbleupon {
background-position:0px -344px;
}
.mbt-bookmarking a.stumbleupon:hover {
background-position:0px -387px;
}
.mbt-bookmarking a.technorati {
background-position:0px -430px;
}
.mbt-bookmarking a.technorati:hover {
background-position:0px -473px;
}
.mbt-bookmarking a.twitter {
background-position:0px -516px;
}
.mbt-bookmarking a.twitter:hover {
background-position:0px -559px;
}
.mbt-bookmarking a.facebook {
background-position:0px -172px;
}
.mbt-bookmarking a.facebook:hover {
background-position:0px -215px;
}
.mbt-bookmarking a.reddit {
background-position:0px -258px;
}
.mbt-bookmarking a.reddit:hover {
background-position:0px -301px;
}
.mbt-bookmarking a.yahoo {
background-position:0px -602px;
}
.mbt-bookmarking a.yahoo:hover {
background-position:0px -645px;
}
.mbt-bookmarking a.rss {
background-position:0px -774px;
}
.mbt-bookmarking a.rss:hover {
background-position:0px -817px;
}
     4.     Now Check the box “Expand Widget Templates” at the top-right-cornerexpand-widgets
     5.      Search for this code <data:post.body/> . If you can not find it then search for this one<p><data:post.body/></p>                                     (Tip:- Press Ctrl + F)
     6.      Just below <data:post.body/> OR <p><data:post.body/></p>, paste this code,
<!--BT4U Bookmarking Widget (HTML)--> <div class='mbt-bookmarking'>
<b:if cond='data:blog.pageType == &quot;item&quot;'>
<br/><font color='#289728' face='ms sans serif' size='3'><b>Kindly Bookmark and Share it:</b></font>
<br/><br/>
<!-- Delicious -->
<a class='delicious' expr:href='&quot;http://del.icio.us/post?url=&quot; + data:post.url + &quot;&amp;title=&quot; + data:post.title' rel='external nofollow' target='_blank' title='Add this to Delicious :&gt;'/>
<!--DIGG-->
<a class='digg' expr:href='&quot;http://digg.com/submit?phase=2&amp;url=&quot;  + data:post.url' rel='external nofollow' target='_blank' title='Digg this :&gt;'/>
<!--Stumble-->
<a class='stumbleupon' expr:href='&quot;http://www.stumbleupon.com/submit?url=&quot; + data:post.url + &quot;&amp;title=&quot; + data:post.title' rel='external nofollow' target='_blank' title='Stumble this :&gt;'/>
<!-- Technorati -->
<a class='technorati' expr:href='&quot;http://technorati.com/faves?add=&quot; + data:post.url' rel='external nofollow' target='_blank' title='Fave this :&gt;'/>
<!-- Twitter -->
<a class='twitter' expr:href='&quot;http://twitthis.com/twit?url=&quot; + data:post.url + &quot;&amp;title=&quot; + data:post.title' rel='external nofollow' target='_blank' title='Tweet this :&gt;'/>
<!--Facebook-->
<a class='facebook' expr:href='&quot;http://www.facebook.com/sharer.php?u=&quot; + data:post.url + &quot;&amp;t=&quot; + data:post.title' rel='external nofollow' target='_blank' title='Share this on Facebook :&gt;'/>
<!-- Reddit -->
<a class='reddit' expr:href='&quot;http://reddit.com/submit?url=&quot; + data:post.url + &quot;&amp;title=&quot; + data:post.title' rel='external nofollow' target='_blank' title='Bookmark and tag this :&gt;'/>
<!-- Yahoo -->
<a class='yahoo' expr:href='&quot;http://myweb2.search.yahoo.com/myresults/bookmarklet?t=&quot; + data:post.url + &quot;&amp;title=&quot; + data:post.title' rel='external nofollow' target='_blank' title='Bookmark this :&gt;'/>
<a class='rss' expr:href='data:blog.homepageUrl + &quot;feeds/posts/default&quot;'/>
</b:if></div>

You can replace the bolded text in green with any statement you like. You can also change the text colour i.e #289728 with any colour you like. Use our Color Chart for this purpose.
   7.     Now Finally save your template and view your blog to see a colorful bookmarking widget just below all your posts :>
That’s All!
If you want larger icons approximately about 64px by 64px in size, then paste the following code just above ]]></b:skin> 
/*--------BT4U Bookmarking Widget (CSS#2)------*/
.mbt-bookmarking a {
display:block;
height:55px;
width:64px;
padding:0 5px;
float:left;
position:relative;
background:url(https://blogger.googleusercontent.com/img/b/R29vZ2xl/AVvXsEj81GJlUQHtKG9alcSGudVSnxWEItBK6yY6O9GrmjEz7T_3uNDxOG27K_qehAxVj2ZLUEnONVl2yBnS6xQ55hsAhuD6D0GhGRykNJcxbRuznsf-Y6w6qzLcSoJDKQv3Ld-ToA7XR1wiyTfk/s1600-h/flapper2.jpg) no-repeat;
}
.mbt-bookmarking a.delicious {
background-position:0px 0px;
}
.mbt-bookmarking a.delicious:hover {
background-position:0px -57px;
}
.mbt-bookmarking a.digg {
background-position:0px -114px;
}
.mbt-bookmarking a.digg:hover {
background-position:0px -171px;
}
.mbt-bookmarking a.stumbleupon {
background-position:0px -228px;
}
.mbt-bookmarking a.stumbleupon:hover {
background-position:0px -285px;
}
.mbt-bookmarking a.technorati {
background-position:0px -570px;
}
.mbt-bookmarking a.technorati:hover {
background-position:0px -627px;
}
.mbt-bookmarking a.twitter {
background-position:0px -684px;
}
.mbt-bookmarking a.twitter:hover {
background-position:0px -741px;
}
.mbt-bookmarking a.facebook {
background-position:0px -456px;
}
.mbt-bookmarking a.facebook:hover {
background-position:0px -513px;
}
.post-bookmark a.reddit {
background-position:0px -342px;
}
.mbt-bookmarking a.reddit:hover {
background-position:0px -399px;
}
.mbt-bookmarking a.yahoo {
background-position:0px -798px;
}
.mbt-bookmarking a.yahoo:hover {
background-position:0px -855px;
}
.mbt-bookmarking a.rss {
background-position:0px -912px;
}
.mbt-bookmarking a.rss:hover {
background-position:0px -969px;
}

Monday, 23 December 2013

Show Off Follower Counts For RSS, Twitter and Facebook Followers

By on 15:30
Follower Counter for facebook, twitter and  feedburnerYou have seen many mind blowing widgets on wordpress blogs but its now time to make Blogger a better place! Presenting to you just another beautiful and yet useful widget that displays the current number of your blog subscribers, twitter and facebook followers. This widget is based solely on pure CSS and HTML with no JavaScript involved therefore you just need to update the counts manually. At present I am learning programming too so as soon as I develop some good command in programming, I will automate all BT4U widgets but at present bear with me as a designer only


Read Also:How The Facebook Help You To Get Traffic

Follow the Steps Below To Add The Follower Counter To Your Blogger Blogs

  1. Go To Blogger > Layout
  2. Choose Add a Gadget or Add a Page element
  3. Select HTML/JavaScript widget
  4. Paste the code below inside it,
<style>
.rss-mbt {
    background: url(https://blogger.googleusercontent.com/img/b/R29vZ2xl/AVvXsEj5CcGbJ34ggtGQjZrKXUou5jE5wUeTVMstOu-8OCD0xPvhN0AbHvyp25JKGeo_f_8JeuSu7-6r9xJ0z9HfAF4SZWZ_8pFFwXAZ5sReYnDlJhpMCfBdoMCU3ofZ0Rq0wfn2Bd4c_4x9UVw/s800/RSS1.png) no-repeat;
    height: 64px;
    padding: 0px 20px 0px 80px;
    margin-top: 20px;
}
.twitter-mbt {
    background: url(https://blogger.googleusercontent.com/img/b/R29vZ2xl/AVvXsEh6wypqYs6t0uZqUIcGVWcFAuhG5NQ8AcSlxQH_shSuXHDmfnov4k-4uGFDwGeGh0DLG5h28MSqQRoZdt7HnKEcAKG0WCZJ0oC20mHPCua5zEl0fhXTVCd1hNPJXKlm3ZvhumXcWyqzNN4/s800/TWITTER1.png) no-repeat;
    height: 64px;
    padding: 0px 20px 0px 80px;
    margin-top: 20px;
}
.facebook-mbt {
    background: url(https://blogger.googleusercontent.com/img/b/R29vZ2xl/AVvXsEilWm_HgQXmH-lRL0JjqU91YKMnxCVKws0idvCu92cOP9-WcJw5tTrOeKw6XEtgQrKHb44ok9nfxMLoZ_3EFgHnHC7GLUaS20cP3nQVDP_KjFwYTjZzmT4hdRjT0YLfAJT4bqWhVAX6FAs/s800/FACEBOOK1.png) no-repeat;
    height: 64px;
    padding: 0px 20px 0px 80px;
    margin-top: 20px;
}
.follower-rss, .follower-twitter, .follower-facebook {
    font-family: Georgia,  sans-serif, Times;
    font-size: 1.1em;
        font-style:italic;
        color:#289728;
}
.follower-rss span {
    font-size: 1.9em;
    font-weight: bold;
        font-style:italic;
        color:#FFB93C;  
}
.follower-twitter span {
    font-size: 1.9em;
    font-weight: bold;
        font-style:italic;
        color:#6DB6E6;  
}
.follower-facebook span {
    font-size: 1.9em;
    font-weight: bold;
        font-style:italic;
        color:#3889BA;  
}
</style>
<div class="rss-mbt">
<div class="follower-rss"> <span>515</span> loyal readers
</div>
<a href="ADD-RSS-FEED-URL-HERE" rel="nofollow">RSS feed</a>
| <a href="ADD-RSS-EMAIL-FEED-URL-HERE" target="_blank" rel="nofollow">E-mail</a>
</div>
<div class="twitter-mbt"><div class="follower-twitter"><span>1058</span> followers</div>                         
<a href="ADD-YOUR-TWITTER-URL-HERE" target="_blank" rel="nofollow" title="I definitely follow you back">Follow us on Twitter!</a>
</div>                       
<div class="facebook-mbt">                     
<div class="follower-facebook"><span>260</span> followers                            </div>                         
<a href="ADD-YOUR-FACEBOOK-URL-HERE" target="_blank" rel="nofollow">Join us on Facebook!</a>
</div>

NOTE:- Make sure to replace the bolded text with the required details (links of your Feedburner, twitter and facebook accounts) and replace the bolded numbers with your current follower counts. For example replace 515  with your current number of Subscribers, replace  1058 with the number of your twitter followers and replace 260 with the number of your facebook followers
     5.    Save and you are done! Now view your blog to see a stunning widget hanging on your sidebar 

Social Share Widget With Counters For Blogger

By on 15:21

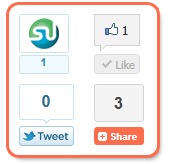
social-share-widget
The Social networking sites growing traffic is indirectly to webmasters themselves. the more they receive traffic the more visitors we receive when people share you content with friends and colleagues. The widget today consists of Facebook, Twitter, StumbleUpon box counters along with Addthis Counter which makes it a complete package of social media sharing buttons. To Add this widget to your blogspot blogs kindly follow the steps mentioned below.

Add Social Share Widget To Blogger

  1. Go To Blogger > Design > Edit HTML
  2. Backup your template
  3. Check the "Expand Widgets Templates" Box
  4. Search for <data:post.body>
  5. Just above it paste the code below,
    Read Also:Twitter Recent Posts Widget, The Rare Widget Ever

<b:if cond='data:blog.pageType == &quot;item&quot;'>
<div align='right'><table border='0' cellpadding='2' cellspacing='0' width='150'><tbody>
    <tr>
      <td valign='top'>    <script src='http://www.stumbleupon.com/hostedbadge.php?s=5'/>
</td>
      <td valign='top'>   <div id='fb-root'/><script src='http://connect.facebook.net/en_US/all.js#xfbml=1'/><fb:like font='' href='' layout='box_count' send='false' show_faces='false'/></td>
    </tr>
    <tr>
      <td valign='top'><a href="http://twitter.com/share" class="twitter-share-button" data-count="vertical">Tweet</a><script type="text/javascript" src="http://platform.twitter.com/widgets.js"></script> </td>
      <td valign='top'>
<!-- AddThis Button BEGIN -->
<div class='addthis_toolbox addthis_default_style '>
<a class='addthis_counter'/>
</div>
<script src='http://s7.addthis.com/js/250/addthis_widget.js#pubid=xa-4de39fde7c998f6e' type='text/javascript'/>
<!-- AddThis Button END -->
</td>
    </tr>
  </tbody></table></div></b:if>

If you wish to align the widget to left then replace  right with left
6.Save and you are done!
Read More:Create a Floating Feedback and Back-To-Top Button For Your Blogs
Let me know if you needed any help.

Sunday, 22 December 2013

Add a Cute Flying Twitter Bird To Your Blogs

By on 13:33
flying-twitter-birdWith Twitter's worldwide popularity and with over 200 million users, generating 65 million tweets a day, it has become a must for every web master to use twitter sharing buttons and applications as much on his web as possible. This lets users to easily  tweet our blogs and websites which thereby generates traffic for us in return. Muhammad Awais Afzal of BT4U has coded a beautiful cute twitter bird that flies from corner to corner of your web page as you scroll up or down. It has a follow me link as well as tweet link. It is compatible with all browsers.
I am sure you will love to see that bird flying.
Read Also:Twitter Recent Posts Widget, The Rare Widget Ever

How To Add the Twitter Flying Bird To Blogger?

  1. Go To Blogger > Design > Edit HTML
  2. Backup your template
  3. Search for </body>
  4. And just above it paste the code below

<script src='http://bloggerblogwidgets.googlecode.com/files/way2blogging.org-tripleflap.js' type='text/javascript'> 
</script> 
<script type='text/javascript'> 
var twitterAccount = &quot;AWAISAFZAL0313&quot;; 
var tweetThisText = &quot; <data:blog.pageTitle/> : <data:blog.url/> &quot;; 
tripleflapInit(); 
</script>

   5.  Replace AWAISAFZAL0313 with your twitter account username.
    6.  Save your template and you are done!
    7.   View your blog to see it flying. :)
If you faced any problem just let me know. Have fun!

How to Create a Table Of Contents Page For Blogger?

By on 13:22
Table-of-contents-for-blogggerYou have seen that I have created an automatically updated table of contents page that shows the links to all posts published so far at this blog. This widget displays all your posts category wise and really saves time. I was previously adding new links manually to the Blogger Tricks page but as soon as I came to know of this great widget from BT4U I instantly converted to it. This widget will also tell visitors that which posts are new and which are old. I have modified the CSS in order to make it suit your blog appearance.

Follow the steps below to create a TOC page for your blog

  1. Go To Blogger > Design > Edit HTML
  2. Back up your template
  3. Search for ]]></b:skin>
  4. And just above it paste the CSS code below,
/*--------BT4U TOC-----*/
.judul-label{
background-color:#E5ECF9;
font-weight:bold;
line-height:1.4em;
margin-bottom:5px;
overflow:hidden;
white-space:nowrap;
vertical-align: baseline;
margin: 0 2px;
outline: none;
cursor: pointer;
text-decoration: none;
font: 14px/100% Arial, Helvetica, sans-serif;
padding: .5em 2em .55em;
text-shadow: 0 1px 1px rgba(0,0,0,.3);
-webkit-border-radius: .5em;
-moz-border-radius: .5em;
border-radius: .5em;
-webkit-box-shadow: 0 1px 2px rgba(0,0,0,.2);
-moz-box-shadow: 1px 1px 4px #AAAAAA;
box-shadow: 0 1px 2px rgba(0,0,0,.2);
color: #e9e9e9;
border: 2px solid white !important;
background: #6e6e6e;
background: -webkit-gradient(linear, left top, left bottom, from(#888), to(#575757));
background: -moz-linear-gradient(top,  #888,  #575757);
filter:  progid:DXImageTransform.Microsoft.gradient(startColorstr='#888888', endColorstr='#575757');
}
.data-list{
line-height:1.5em;
margin-left:5px;
margin-right:5px;
padding-left:15px;
padding-right:5px;
white-space:nowrap;
text-align:left;
font-family:"Arial",sans-serif;
font-size:12px;
}
.list-ganjil{
background-color:#F6F6F6;
}
.headactive{
    color: #fef4e9;
    border: 2px solid white !important;
    background: #1C8DFF;
    background: -webkit-gradient(linear, left top, left bottom, from(#9dc2e7), to(#438cd2));
    background: -moz-linear-gradient(top,  #9dc2e7,  #438cd2);
    filter:  progid:DXImageTransform.Microsoft.gradient(startColorstr='#9dc2e7', endColorstr='#438cd2');
}                                                                                                                                                                                                                                                                                                       
     5.   Save your template and now create a New Page (not a new Post).
     6.    Give Your new Page a relevant title like “XYZ Table Of Contents” and then in the EDIT HTML mode of your blogger editor paste the code below,
UPDATED CODE:

<script src="http://abu-farhan.com/script/acctoc/daftarisiv2-pack.js"></script>
<script src="http://www.bloggertrick4you.blogspot.com/feeds/posts/summary?max-results=1000&amp;alt=json-in-script&amp;callback=loadtoc"></script>
<script type="text/javascript">
var accToc=true;
</script>
<script src="http://abu-farhan.com/script/acctoc/accordion-pack.js" type="text/javascript"></script>                                                                                                                                                    

See a screenshot on how things will appear,
Table-of-contents
Now simply replace http://www.bloggertrick4you.blogspot.com with your Blog URL and hit save. View your new page to see a beautiful Table Of Contents with a nice drop down effect.

Customize The TOC widget

By default I have kept the Category background in active colour mode to appear as blue and inactive as dark gray as shown below,
Customize-TOC

If you want to change the colour of the Active mode then simple change #9dc2e7 and #438cd2 . Here #9dc2e7   refers to a lighter shade and #438cd2 refers to a darker shade colour. So whatever colour you wish to use simply replace #438cd2 with your prefered colour and #9dc2e7  with the lighter shade of your prefered colour.

How to add Google Custom Search Box to your Blog/Website

By on 13:12

Google has a fantastic service of adding their custom search box to any blog/website.Search box helps your visitors in finding the content of their interest without moving away from your blog.
Google Custom Search engine is easy a search box on your website which show you search results on web history on Google but there is a benefit when you put upon your website page because people when search this box ads are appear in these results and you can easily make money form Google Custom Search engine.


How to add Google Custom Search Box to your Blog

If you have a account of Google Adsense then you can easily do this for making money from your website. 


Also check:How to Get Your Web Site to the First Results Page


Steps to add Google Custom Search Engine:


1.Go to Google Custom Search Engine or www.google.com/cse
2.Log in into your account.
3.Click on New Search Engine and enter your blog details.
4.Now hit on create button.


How to add Google Custom Search Box to your Blog

5.You have successfully created your custom search engine for your blog.
6.Now Click on Edit Search Engine to comletely Customize your Search engine.

How to add Google Custom Search Box to your Blog

7.Now click on "Setup" and enter your search engine name and Keywords realted to your blog.

How to add Google Custom Search Box to your Blog


8.Click on "Make money" and fill up your Adsense Detalis.
9.Go to "Look and Feel" and select the colours and layouts of your search engine.

How to add Google Custom Search Box to your Blog


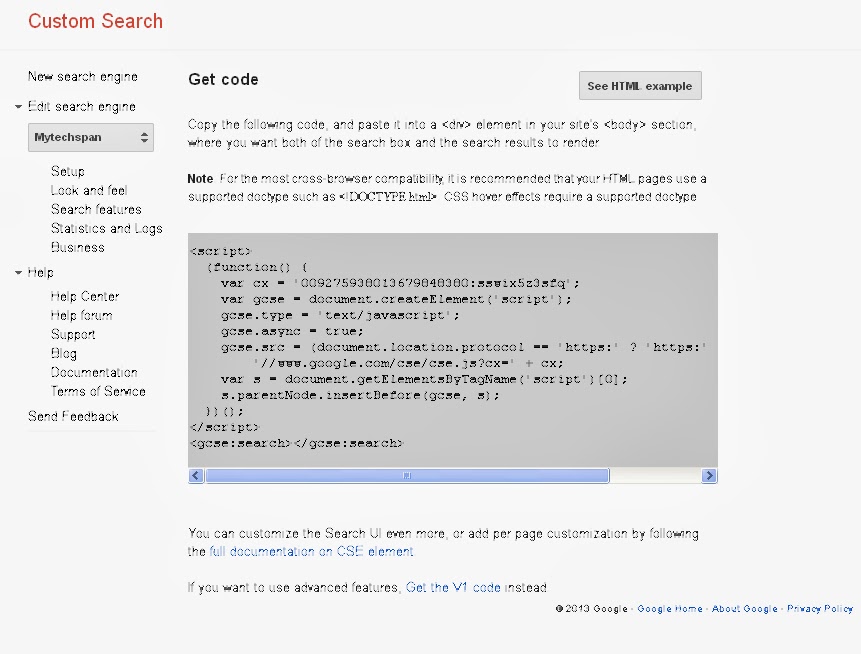
10.Now go to setup and click on getcode and copy it. 


How to add Google Custom Search Box to your Blog

11.Open your Blogger Dashboard and navigate to Layout->Add Gadget.

How to add Google Custom Search Box to your Blog

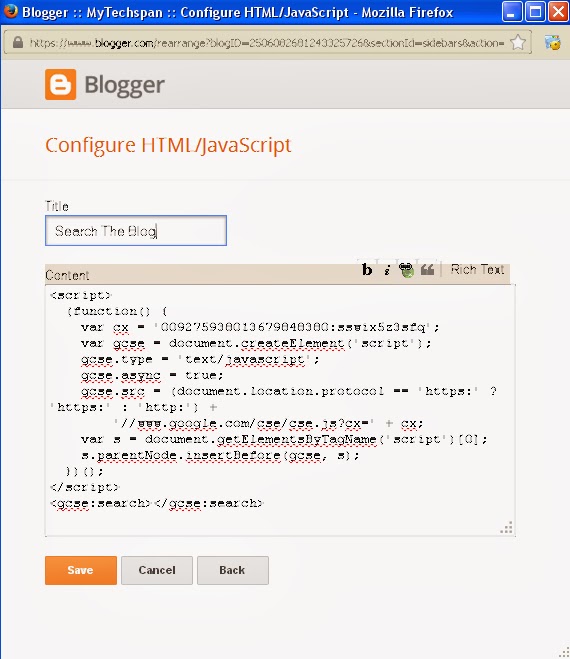
12.Select "HTML/Java script" and paste the code and save it.

How to add Google Custom Search Box to your Blog


13.Drag it to your desired position.
14.You are done.